Have you ever wondered how to create a stacked column chart in Salesforce? Well, you’re in luck! Stacked column charts are a great way to visualize data in a clear and organized manner. In this article, we’ll walk you through the steps to create a stacked column chart in Salesforce.
First, log in to your Salesforce account and navigate to the Reports tab. Click on New Report and select the object you want to create the stacked column chart for. Once you’ve selected the object, click on Create. You’ll then be taken to the report builder where you can start building your chart.
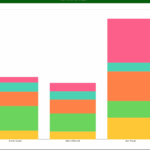
Stacked Column Chart Salesforce
Creating a Stacked Column Chart Salesforce
Next, click on the Add Chart button and select the Stacked Column Chart option. Choose the fields you want to display on the chart, such as the x-axis and y-axis fields. You can also add filters to customize the data displayed on the chart.
Once you’ve configured the chart settings to your liking, click on Save and Run. Your stacked column chart will now be generated based on the data from your Salesforce object. You can further customize the chart by adding titles, labels, and legends to make it more visually appealing.
In conclusion, creating a stacked column chart in Salesforce is a simple and effective way to visualize your data. By following the steps outlined in this article, you’ll be able to create a professional-looking chart that will help you make informed business decisions. Give it a try and see the difference it can make!