Are you looking to create a clustered column chart in Office 365 but not sure where to start? Don’t worry, we’ve got you covered! With just a few simple steps, you’ll be able to visualize your data in a clear and organized way.
Creating a clustered column chart in Office 365 is a great way to compare different data points within the same category. Whether you’re analyzing sales figures, survey results, or any other type of data, this type of chart can help you spot trends and patterns easily.

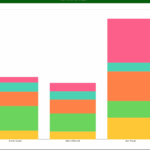
Clustered Column Chart Office 365 Steps
Clustered Column Chart Office 365 Steps
To create a clustered column chart in Office 365, first, open Excel and select the data you want to include in the chart. Then, go to the Insert tab and click on the Column Chart icon. From the dropdown menu, choose Clustered Column Chart.
Next, you can customize your chart by adding titles, axes labels, and legends. You can also change the colors and styles of the columns to make your chart more visually appealing. Once you’re happy with how your chart looks, you can save it or insert it into a report or presentation.
With these simple steps, you can create a professional-looking clustered column chart in Office 365 in no time. Whether you’re a beginner or an experienced user, this type of chart can help you communicate your data effectively and make informed decisions based on your analysis.
So why wait? Start creating your own clustered column charts in Office 365 today and take your data visualization skills to the next level!